Buchi Rotavapor Operation Guide: Complete Beginner's Manual
Safety Notice
Always follow proper safety procedures when performing maintenance or repairs on laboratory equipment. Ensure equipment is powered off and disconnected before beginning any work. If you're unsure about any procedure, consult with a qualified technician.
Buchi Rotavapor: Complete Beginner's Operation Guide
Rotary evaporators are fundamental instruments in chemistry laboratories, used for efficient and gentle removal of solvents from samples. The Buchi Rotavapor line represents industry-leading technology in rotary evaporation. This comprehensive beginner's guide will take you through every step of setup, operation, and shutdown, ensuring safe and effective use of your Rotavapor system.
Understanding Rotary Evaporation
Before operating a Rotavapor, it's important to understand the fundamental principle: rotary evaporation uses reduced pressure (vacuum) to lower the boiling point of solvents, allowing gentle evaporation at moderate temperatures. The rotation of the sample flask creates a thin film that increases surface area and promotes even, efficient evaporation.
Key Benefits:
- Gentle evaporation prevents thermal degradation of sensitive compounds
- Faster evaporation compared to standard distillation
- Efficient solvent recovery for environmental and cost benefits
- Precise temperature and vacuum control for reproducible results
- Reduced bumping compared to conventional heating methods
Essential Safety Information
CRITICAL SAFETY REQUIREMENTS - READ BEFORE OPERATION
Personal Protective Equipment (PPE)
Always wear appropriate PPE when operating a Rotavapor:
✓ Safety goggles or face shield - Protects against glass breakage and chemical splashes
✓ Chemical-resistant gloves - Nitrile or appropriate material for solvents used
✓ Laboratory coat - Provides barrier protection from spills
✓ Closed-toe shoes - Protects feet from spills and broken glass
✓ Heat-resistant gloves - When handling warm glassware or heating bath
Primary Hazards
According to OSHA regulations (29 CFR 1910.1450), laboratory workers must be trained on specific hazards associated with equipment and chemicals they use:
Chemical Hazards:
- Solvent vapor exposure through leaks or improper venting
- Residual chemicals in glassware during handling
- Spills during sample transfer or collection
Physical Hazards:
- Implosion risk: Glassware under vacuum can implode if damaged
- Thermal burns: Heating bath temperatures up to 220°C
- Rotating parts: Entanglement hazard from rotating flask assembly
- Electrical shock: Line voltage equipment (100-240V AC)
Prevention Measures:
| Hazard | Prevention Method | Required Action | |--------|-------------------|------------------| | Glass implosion | Use plastic-coated glassware | Inspect for cracks before each use | | Solvent vapor exposure | Operate in fume hood | Verify adequate airflow (100 fpm minimum) | | Thermal burns | Allow cooling time | Wait 30+ minutes after shutdown | | Chemical exposure | Proper labeling and SDS | Review SDS before working with new solvents | | Electrical shock | Proper grounding | Inspect power cord and plug regularly |
Emergency Procedures
In Case of Emergency:
-
Glass breakage: Stop rotation immediately, release vacuum slowly, secure heating bath controls, use sharps container for cleanup
-
Solvent spill: Evacuate area if large spill, activate emergency ventilation, contain spill with absorbent material, follow your facility's spill response plan
-
Fire: Activate fire alarm, evacuate, use appropriate extinguisher only if fire is small and contained (Class B for flammable liquids)
-
Equipment malfunction: Stop operation immediately, document issue, post "Do Not Use" sign, contact supervisor or maintenance
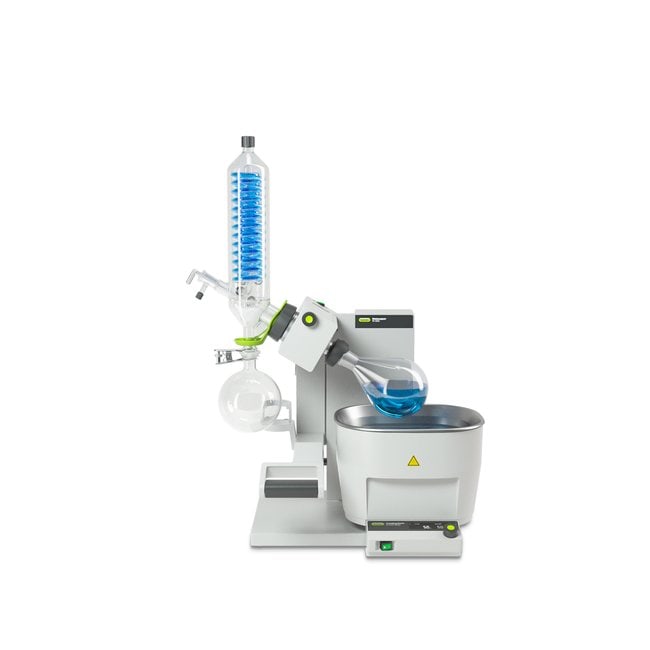
Components of a Buchi Rotavapor System
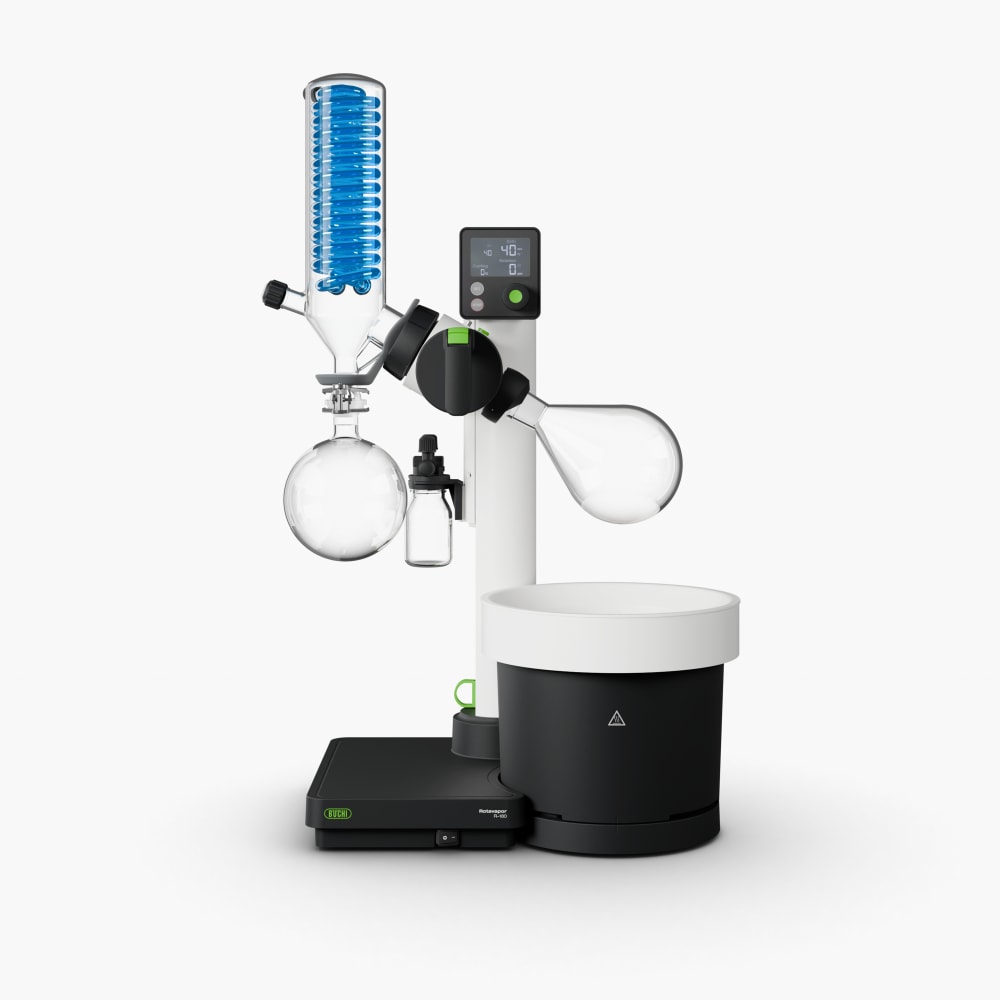
A complete Rotavapor system consists of several integrated components:
1. Motorized Drive Unit:
- Controls flask rotation speed (typically 10-280 rpm)
- Electronic or manual lift mechanism
- Digital display and controls (on modern models)
2. Evaporation Assembly:
- Rotary seal (maintains vacuum while flask rotates)
- Flask clamp or adapter
- Vapor duct (channels vapors to condenser)
3. Condenser:
- Cools and condenses solvent vapors
- Cooled by recirculating chiller or tap water
- Various designs: diagonal, vertical, or dry ice condenser
4. Collection Flask:
- Captures condensed solvent
- Must be properly sized for sample volume
- Easily removable for solvent recovery
5. Heating Bath:
- Heats the evaporating flask
- Water bath (up to 95°C) or oil bath (up to 220°C)
- Digital temperature control
6. Vacuum System:
- Vacuum pump (diaphragm, rotary vane, or aspirator)
- Vacuum controller (manual or electronic like I-300)
- Tubing and connections

Pre-Operation Checklist
Before each use, complete this systematic inspection:
✓ Glassware Inspection:
- [ ] Check all glassware for cracks, chips, or stress marks
- [ ] Verify ground glass joints are clean and lightly greased
- [ ] Ensure proper flask sizes selected (evaporating and collection)
- [ ] Confirm bump trap installed (if using volatile solvents)
✓ System Connections:
- [ ] All clamps secure and properly tightened
- [ ] Vacuum tubing intact without cracks
- [ ] Condenser coolant lines connected
- [ ] Collection flask properly sealed
✓ Mechanical Systems:
- [ ] Flask clamp opens and closes smoothly
- [ ] Lift mechanism operates correctly (if equipped)
- [ ] No unusual sounds when motor is briefly tested
- [ ] Emergency stop accessible and functional
✓ Heating and Cooling:
- [ ] Heating bath filled to proper level
- [ ] Bath fluid appropriate for target temperature (water or oil)
- [ ] Coolant flowing through condenser
- [ ] Condenser temperature adequate for solvent being used
✓ Vacuum System:
- [ ] Vacuum pump powered and functional
- [ ] Ultimate vacuum verified (brief test)
- [ ] Vacuum controller set correctly
- [ ] All valves and stopcocks in proper positions
✓ Safety:
- [ ] Fume hood airflow adequate (verify with tissue test)
- [ ] PPE worn correctly
- [ ] Work area clear of obstructions
- [ ] Emergency procedures reviewed
Step-by-Step Setup Procedure
Step 1: Prepare Your Workspace
- Clear the work area of unnecessary items
- Verify fume hood is operational
- Ensure adequate lighting
- Have sample and collection containers ready
- Review Safety Data Sheets for solvents being used
Step 2: Assemble the Glassware
Proper Assembly Order:
-
Install condenser on the drive unit mounting port
- Ensure secure connection
- Connect coolant inlet and outlet tubing
- Verify coolant flow direction (usually bottom to top)
-
Attach collection flask to condenser bottom
- Use appropriate clip or clamp
- Ensure vacuum-tight seal
- Position drain valve for easy access
-
Connect vapor duct between condenser and evaporating flask position
- Check o-ring or seal condition
- Secure all clamp connections
-
Install bump trap (if required for your application)
- Position between evaporating flask and vapor duct
- Essential for foaming or bumping samples
-
Prepare evaporating flask
- Select appropriate size (fill to 40-50% capacity maximum)
- Attach to flask clamp or adapter
- Do not attach to system yet
Step 3: Configure Operating Systems
Heating Bath Setup:
- Verify bath fluid level (within marked range)
- Position bath beneath evaporating flask position
- Set initial temperature to 20°C above solvent boiling point at your target vacuum
- Allow bath to reach temperature before immersing flask
Cooling System Activation:
- Start recirculating chiller (or open tap water valve)
- Verify coolant flowing through condenser
- Target condenser temperature: -10°C to +5°C for most common solvents
- Check for leaks in cooling lines
Vacuum System Preparation:
- Start vacuum pump
- Verify pump reaches ultimate vacuum (typically <10 mbar for V-700)
- Set vacuum controller to appropriate level for your solvent
- Keep system vented until ready to begin evaporation
Step 4: Sample Loading
Proper Sample Transfer:
- Fill evaporating flask to 40-50% capacity maximum
- For larger volumes, plan multiple batches
- Pre-cool samples containing dissolved gases
- Label flask with contents and date
- Attach flask securely to flask clamp
Important Notes:
- Never exceed maximum flask capacity for your model
- Overfilling causes bumping and contamination
- Use appropriate adapter for flask neck size
Operating the Buchi Rotavapor
Standard Operating Parameters
The following table provides starting points for common solvents. Adjust based on your specific application:
| Solvent | Vacuum (mbar) | Bath Temp (°C) | Rotation (rpm) | Vapor Temp (°C) | Condenser Temp (°C) | |---------|---------------|----------------|----------------|-----------------|---------------------| | Acetone | 300-400 | 40-50 | 150 | 20-30 | -10 to 0 | | Acetonitrile | 200-300 | 50-60 | 150 | 30-40 | -10 to 0 | | Chloroform | 400-500 | 40-50 | 120 | 20-30 | 0 to 5 | | Dichloromethane | 500-600 | 30-40 | 120 | 15-25 | -10 to 0 | | Ethanol | 100-150 | 50-60 | 150 | 35-45 | 0 to 5 | | Ethyl Acetate | 200-300 | 45-55 | 150 | 25-35 | 0 to 5 | | Hexane | 300-400 | 40-50 | 150 | 25-35 | -10 to 0 | | Methanol | 200-300 | 50-60 | 150 | 30-40 | 0 to 5 | | Tetrahydrofuran | 200-300 | 40-50 | 150 | 25-35 | -10 to 0 | | Toluene | 50-100 | 60-70 | 150 | 40-50 | 5 to 10 | | Water | 50-100 | 60-80 | 150 | 40-55 | 10 to 15 |
The 20/40/60 Rule
A simple guideline for setting operating parameters:
- Heating bath: 20°C above vapor temperature
- Vapor temperature: At or near solvent boiling point at the vacuum level used
- Condenser: 20°C below vapor temperature
- Total temperature differential: Approximately 40°C from bath to condenser
Step-by-Step Operation
1. Start Rotation (Before Applying Vacuum):
- Set rotation speed to 80-100 rpm initially
- Verify smooth rotation without wobbling
- Ensure flask clamp holds securely
- Increase to target speed (typically 120-180 rpm)
2. Immerse Flask in Heating Bath:
- Use lift mechanism to lower flask slowly
- Immerse to appropriate depth (typically 2/3 of liquid volume)
- Verify even heating
- Monitor for excessive bumping
3. Apply Vacuum Gradually:
- Critical: Never apply full vacuum suddenly
- Start at 500-600 mbar
- Gradually reduce pressure over 2-3 minutes
- Monitor sample carefully for bumping
- Stop at target vacuum level
4. Monitor Evaporation:
Once stable operation is achieved, monitor these indicators:
✓ Evaporation rate: Steady drip of condensate into collection flask
✓ Sample behavior: No vigorous bumping or foaming
✓ Temperature stability: Bath maintains set temperature
✓ Vacuum stability: Pressure remains constant (indicates no leaks)
✓ Condenser performance: Vapors fully condensing (no vapor escaping to vacuum pump)
5. Optimization:
If evaporation is too slow:
- Increase bath temperature by 5-10°C
- Increase vacuum (decrease pressure by 50-100 mbar)
- Increase rotation speed by 20-30 rpm
If bumping occurs:
- Decrease bath temperature by 10°C
- Decrease vacuum (increase pressure by 50-100 mbar)
- Decrease rotation speed
- Add boiling chips or use bump trap
6. Completion:
Evaporation is complete when:
- Condensate flow stops completely
- Sample volume appears stable
- No visible vapor generation
- Vacuum pressure stabilizes
Proper Shutdown Procedure
Critical: Follow this sequence to prevent accidents and contamination
Step 1: Vent Vacuum System
- Never disconnect glassware under vacuum
- Slowly open vent valve or stopcock
- Allow pressure to equalize gradually
- Wait for complete venting before proceeding
Step 2: Raise Flask from Heating Bath
- Use lift mechanism to elevate flask
- Allow flask to cool for 2-3 minutes in air
- Do not remove immediately
Step 3: Stop Rotation
- Reduce speed gradually to zero
- Allow flask to come to complete stop
- Verify no residual motion
Step 4: Remove Evaporating Flask
- Carefully disconnect flask from clamp
- Handle with heat-resistant gloves if warm
- Transfer concentrated sample to appropriate storage container
- Label container immediately
Step 5: Collect Recovered Solvent
- Drain collection flask into appropriate waste or recovery container
- Follow your facility's solvent disposal guidelines
- Clean collection flask if changing solvents
Step 6: Clean Glassware
- Rinse all glassware with appropriate solvent
- For final cleaning, use detergent and water
- Inspect for residue or damage
- Store properly on protective racks
Step 7: System Shutdown
- Turn off heating bath and allow to cool
- Stop coolant flow to condenser
- Turn off vacuum pump
- Disconnect power if equipment will not be used again today
- Complete maintenance log entry
Troubleshooting Common Beginner Issues
Problem: Slow or No Evaporation
Possible Causes:
- Vacuum too low (pressure too high)
- Bath temperature too low
- Condenser too warm
- Vacuum leak
Solutions:
- Check vacuum gauge reading and increase vacuum
- Increase bath temperature gradually
- Verify condenser coolant flow and temperature
- Perform systematic leak check
Problem: Bumping or Violent Boiling
Possible Causes:
- Vacuum applied too quickly
- Bath temperature too high
- Sample supersaturated with dissolved gases
Solutions:
- Vent system and restart with gradual vacuum application
- Reduce bath temperature by 10-15°C
- Pre-cool sample before evaporation
- Use bump trap
- Add boiling chips (for non-dissolved samples)
Problem: Solvent Reaching Vacuum Pump
Possible Causes:
- Condenser not cold enough
- Evaporation rate too fast
- Condenser capacity exceeded
Solutions:
- Decrease condenser temperature
- Reduce bath temperature
- Reduce vacuum level
- Allow condenser time to clear
Problem: Sample Spraying into Condenser
Possible Causes:
- Vacuum applied too rapidly
- Flask overfilled
- Excessive bumping
Solutions:
- Vent system immediately
- Remove flask and reduce sample volume
- Clean contaminated glassware
- Restart with more gradual vacuum application
Best Practices for Efficient Operation
Optimize Your Workflow:
-
Batch similar samples: Group samples with similar solvents to minimize cleaning between runs
-
Pre-plan parameters: Reference solvent tables and set equipment before starting
-
Use appropriate flask sizes: Match flask size to sample volume for optimal efficiency
-
Maintain cleanliness: Clean glassware immediately after use prevents residue buildup
-
Document your work: Record parameters used for reproducibility
-
Regular maintenance: Follow daily inspection checklist to prevent issues
Energy Efficiency:
- Use water bath instead of oil bath when temperatures below 95°C are adequate
- Turn off heating bath when not in use
- Use vacuum controller to avoid running pump at full capacity unnecessarily
- Properly insulated heating baths reduce energy consumption
Training and Competency
Before operating a Rotavapor independently, ensure you have:
✓ Completed formal laboratory safety training
✓ Reviewed equipment-specific operating manual
✓ Observed experienced user performing complete operation
✓ Performed supervised operations until competent
✓ Demonstrated knowledge of emergency procedures
✓ Understanding of chemical hazards for solvents you will use
Conclusion
Buchi Rotavapor systems are sophisticated yet user-friendly instruments that, when operated correctly, provide efficient and reliable solvent evaporation. By following this beginner's guide, adhering to safety protocols, and gaining experience through practice, you'll develop proficiency in rotary evaporation techniques. Remember that safety is paramount—when in doubt, ask for guidance from experienced colleagues or supervisors.
References:
- Buchi Labortechnik AG. "Operating Instructions Rotavapor R-300." Buchi.com, 2024. www.buchi.com/support
- U.S. Department of Labor. "Occupational Exposure to Hazardous Chemicals in Laboratories." OSHA.gov, 29 CFR 1910.1450. www.osha.gov/laws-regs/regulations/standardnumber/1910/1910.1450
- Buchi Labortechnik AG. "Safety Guidelines for Rotary Evaporators." Technical Documentation, 2024.
This guide provides general operating instructions for Buchi Rotavapor systems. Always consult your specific model's operating manual and follow your institution's standard operating procedures and safety protocols. Never operate equipment without proper training and authorization.
Disclaimer
This technical guide is provided for informational purposes only. While we strive for accuracy, equipment specifications and procedures may vary. Always consult official manufacturer documentation and qualified technicians for specific repair procedures. The author and Buchi Equipment Authority assume no liability for any damages or injuries resulting from the use of this information.